 how-to
How to Store Emergency Food: A 2026 Step-by-Step Guide
Table of Contents
- What You'll Need Before You Start
- Step 1: Choose the Best Non-Perishable Foods for Emergencies
- Step 2: Select Proper Containers and Packaging
- Step 3: Control Temperature, Moisture, and Pests
- Step 4: Build a Food Rotation System for Preppers
- Step 5: Understand Long Term Food Storage Shelf Life
- Step 6: Plan Water and Food Ratios for Your Supply
- Common Mistakes to Avoid When Storing Emergency Food
- Frequently Asked Questions
Last Updated: September 11, 2026
What You'll Need Before You Start
Knowing how to store emergency food starts with a two-part decision: what you're protecting against, and where the food will physically live. Before you buy anything, map your space and set a realistic budget.
Essential Supplies and Tools
You don't need much to start, but the basics matter more than the volume of food you buy:
- Food-grade containers with airtight seals
- Mylar bags and oxygen absorbers for dry goods
- Labels and a permanent marker for dates
- A thermometer for your storage area
- A simple inventory list, on paper or in a spreadsheet
Assessing Your Space and Budget
Cool, dark, and dry beats "big." A closet floor or the bottom of a linen cabinet works better than a garage shelf that swings between hot and cold. Walk your home and find the spot with the steadiest temperature, then size your supply to fit it.
For budget, separate one-time costs (containers, absorbers, shelving) from recurring costs (food you'll rotate through anyway). Buying shelf-stable staples you already eat spreads the expense across normal grocery trips instead of one painful purchase.
Step 1: Choose the Best Non-Perishable Foods for Emergencies
The best non-perishable foods for emergencies are shelf-stable staples your household already eats: rice, dry beans, oats, pasta, canned proteins, peanut butter, and freeze-dried or dehydrated fruits and vegetables. Familiar food gets eaten and rotated; unfamiliar food sits until it expires.
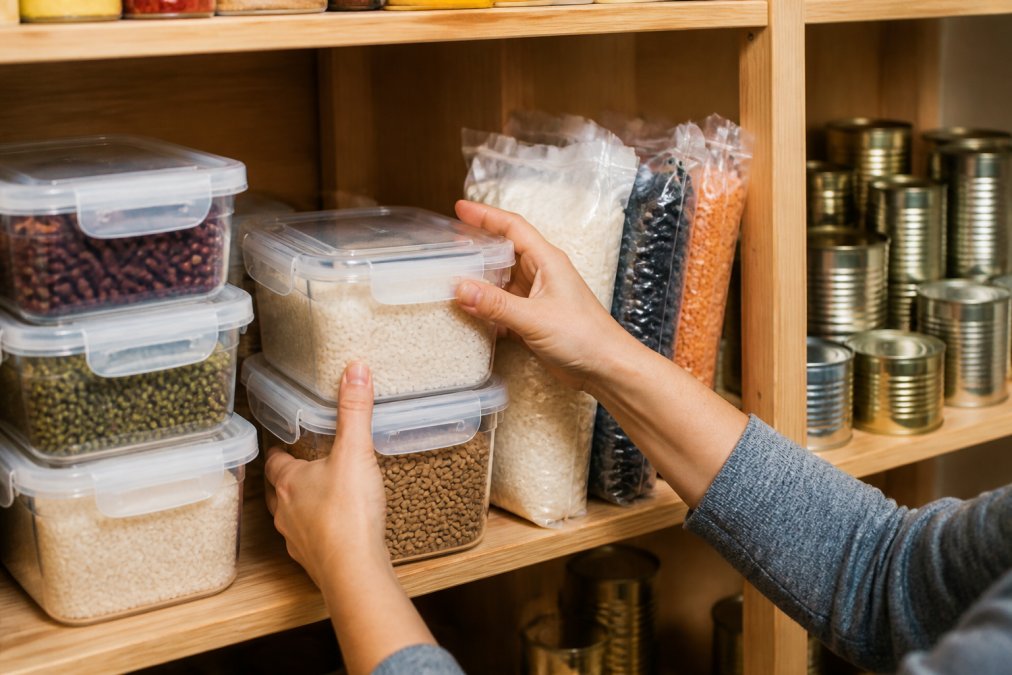
Build your list around nutrient density and calorie requirements, not just volume. Rice and beans together cover more nutritional ground than either alone, and canned goods add ready-to-eat options that need no cooking if the power is out.
- Grains: white rice, oats, pasta, flour
- Proteins: canned tuna and chicken, dry beans, peanut butter
- Produce: canned vegetables, freeze-dried fruit
- Extras: honey, salt, instant coffee, powdered milk
Planning Around Dietary Restrictions
Most emergency food lists assume a household with no dietary limits. That assumption breaks the plan the moment someone in your home is gluten-free, diabetic, managing blood pressure, allergic to nuts, or feeding an infant. Store food your household can actually eat, because a supply nobody can safely consume is not a supply.
Gluten-free households. Standard emergency staples are wheat-heavy: pasta, flour, most crackers, and many canned soups. Swap in certified gluten-free oats, white rice, corn masa, quinoa, canned beans, and gluten-free pasta. Check labels on canned goods and sauces, since wheat and barley hide in thickeners and broths.
Diabetes and blood-sugar management. Many shelf-stable staples spike blood sugar: white rice, instant potatoes, sweetened canned fruit, and juice. Favor canned or pouched proteins, nuts and nut butters, low-sugar canned vegetables, and whole grains like steel-cut oats. Keep a stash of shelf-stable glucose sources on hand for hypoglycemia, and store them where they are easy to reach.
Low-sodium and heart-healthy needs. Canned goods are the workhorse of emergency storage, but they are also sodium-heavy. Buy no-salt-added canned vegetables and beans, rinse regular canned beans before use, and stock salt-free seasonings so flavor does not depend on sodium.
Food allergies. If someone in your home has a peanut, tree nut, shellfish, or soy allergy, read every label on every can and pouch. Cross-contamination warnings matter as much as ingredient lists. Store allergen-safe alternatives in separate, clearly labeled containers so no one grabs the wrong item in a hurry.
Infants and toddlers. Infant formula, breast milk storage bags, and jarred baby food have short shelf lives and specific storage rules. Rotate formula and baby food on a tighter cycle than adult staples, and keep a manual pump or backup feeding supplies if the power is out.
Skip anything your family won't actually eat. A stocked shelf of food nobody touches is just expensive clutter, and it wastes the rotation cycle that keeps a supply fresh.
Step 2: Select Proper Containers and Packaging
Proper containers do three jobs at once: block moisture, block oxygen, and block pests. The container you choose matters more than the food you put in it, because even good food fails in a bad package.
Airtight Containers, Mylar Bags, and Oxygen Absorbers
For dry goods like rice, oats, and beans, the reliable combination is a mylar bag, an oxygen absorber, and a food-grade bucket or bin to protect the bag from punctures. Oxygen absorbers pull the oxygen out of the sealed bag, which slows spoilage and kills insect eggs already in the grain (peer-reviewed research).
For pantry items you use weekly, airtight containers with gasketed lids are enough. Both approaches beat the original packaging, which lets in air and invites pests.
| Storage Method | Best For | Main Strength |
|---|---|---|
| Mylar bag + oxygen absorber | Long-term dry goods | Blocks oxygen and moisture |
| Airtight gasketed container | Everyday pantry rotation | Easy access, resealable |
| Vacuum sealing | Smaller portions, nuts, coffee | Compact, limits oxygen |
| Original packaging | Short-term only | Free, but weak protection |
Step 3: Control Temperature, Moisture, and Pests
Ideal storage conditions are cool, dark, and dry, with a steady temperature between roughly 50°F and 70°F (fsis.usda.gov). Every 10°F above that range speeds up how quickly food quality declines, so a stable closet beats a fluctuating garage every time.
Ideal Storage Conditions and Monitoring
Temperature fluctuations are the quiet killer of long-term storage. Heat accelerates the breakdown of fats and vitamins, and repeated swings push moisture in and out of containers. Keep a thermometer in your storage area and check it monthly.
Moisture control and pest prevention go together. A dry environment discourages mold, and sealed containers keep insects and rodents out. If you spot webbing or clumping in a grain container, discard that container and inspect its neighbors.
Step 4: Build a Food Rotation System for Preppers
A food rotation system for preppers is simple: eat what you store, and store what you eat. First-in, first-out means the oldest items move to the front and get used first, so nothing quietly expires at the back of the shelf.
Inventory Management and First-In, First-Out
Inventory management is the part most guides skip, and it's the part that saves money. Keep a running list of what you have, its expiration date, and its location. Update it whenever you add or use an item.
- Write the purchase date on every container
- Move older stock to the front when you restock
- Review the list monthly and pull anything nearing its date
- Cook from your storage once a week to keep it turning over
Use expiration dates as your rotation trigger, not a hard discard rule. Most shelf-stable foods stay safe well past their printed date; quality drops before safety does. Rotating regularly means you rarely have to make that call.
Choosing an Inventory Tracking System
A paper list works until it doesn't. Once your supply passes a few dozen items, you need a system that survives a busy month. Three approaches cover most households:
Paper and binder. A three-ring binder with one page per category (grains, proteins, canned goods, water) is the cheapest option and works when the power is out. Columns: item, quantity, purchase date, expiration date, location. Update it with a pen after every grocery run. The downside is that it only works if you actually sit down and update it.
Spreadsheet. A simple spreadsheet in a free app like Google Sheets or a local file gives you sorting, filtering, and automatic date math. Set a column that flags anything expiring within 90 days. Share it with everyone in the household so restocking is not one person's job. This is the sweet spot for most families.
Dedicated apps. Several pantry-tracking and expiration-reminder apps exist for phones, and most offer barcode scanning so adding an item takes seconds. The trade-off is that they depend on a charged device and a working network or local storage. Treat the app as your primary tracker and keep a paper backup of the master list.
A Simple Rotation Schedule
Rotation fails when it depends on memory. Put it on a calendar instead:
- Weekly: cook one meal entirely from stored food. This is your taste test and your rotation in one habit.
- Monthly: walk the shelves, check dates, move older items forward, and update the inventory list.
- Quarterly: review the full inventory against your plan. Fill gaps, replace anything you pulled, and check water supplies.
- Annually: reassess headcount, dietary needs, and storage space. Adjust quantities up or down.
Tracking Expiration Dates Without Overthinking It
You do not need to track every can to the day. Group items into three rotation tiers:
- Fast rotation (use within a year): oils, nuts, crackers, anything with a short shelf life. Keep these at eye level and use them first.
- Medium rotation (one to five years): canned goods, pasta, white flour. Check dates quarterly.
- Slow rotation (five years and up): mylar-sealed rice, dry beans, freeze-dried foods. Check dates annually and trust the seal.
Label every container with the month and year you stored it, not just the printed date. That single habit makes the whole system readable at a glance.
Step 5: Understand Long Term Food Storage Shelf Life
Knowing how to store emergency food for the long term comes down to three things: the food itself, the packaging, and the storage conditions. Get all three right and staples like white rice and dry beans hold quality for years, while canned goods typically last two to five years.
The variables stack. A mylar-sealed bag of rice in a cool closet outlasts the same rice in a hot garage by a wide margin, and an airtight container beats a rolled-up bag every time. Track shelf life by category rather than memorizing individual dates:
- Grains and dry beans: longest-lasting when sealed and kept cool
- Canned goods: reliable for several years, rotate steadily
- Freeze-dried and dehydrated food: long shelf life with strong flavor retention
- Oils and nuts: shortest window, rotate most often
Check stored food for quality before you rely on it. Off smells, discoloration, or swollen cans mean it's time to replace that item.
Step 6: Plan Water and Food Ratios for Your Supply
Water is the supply people forget, and it's the one you can't store enough of. A practical starting point is one gallon of water per person per day for drinking and basic sanitation, plus water for any food that needs cooking or rehydration (ready.gov).
Match your water-to-food ratio to what you actually store. Dry rice and beans need water to cook, so a supply heavy in dry goods needs more water than one built on canned, ready-to-eat food. If you're storing for a household, multiply by headcount and by the number of days you're planning for.
For apartments and small spaces, water storage is the hard constraint. Stackable water containers and a few cases of bottled water fit under beds and in closets. Pair every dry staple with a plan for the water it needs, or that food becomes unusable when you need it most.
Common Mistakes to Avoid When Storing Emergency Food
The biggest mistake is storing food somewhere convenient instead of somewhere stable. A hot garage or a damp basement undermines everything else you do, no matter how good your containers are.
Other mistakes we see often:
- Buying in bulk before testing what you like. Buy small, eat it, then scale up.
- Skipping rotation. Food you never touch is money on a shelf, not a supply.
- Forgetting water. Dry food without water is a plan that stalls on day one.
- Ignoring dietary restrictions. Store food your household can actually eat, including allergy-safe and low-sodium options.
- No inventory. Without a list, you buy duplicates and miss gaps.
What most guides miss is that storage isn't a one-time project. It's a small habit, a monthly check, a weekly meal from the shelf, and a restock that keeps the whole system alive.
Frequently Asked Questions
What are the best containers for long-term emergency food storage?
Food-grade plastic buckets with airtight lids, Mylar bags sealed with oxygen absorbers, and glass jars with rubber gaskets work best. For dry goods like rice and beans, combine Mylar bags inside buckets for double protection. Vacuum-sealed bags suit smaller quantities. Avoid clear containers in bright rooms because light degrades food quality. Always label each container with the contents and storage date so your food rotation system stays accurate.
How often should you rotate your emergency food supply?
Check your supply every six months and rotate anything nearing its expiration date into daily meals. A first-in, first-out food rotation system for preppers keeps older items moving out before they spoil. Canned goods typically last 1-2 years, while freeze-dried and dehydrated foods in Mylar bags can last 10-25 years. Set calendar reminders and keep an inventory list so nothing gets forgotten at the back of the shelf.
How much emergency food should a family of four have?
It is generally recommended to have at least a 2-week supply of non-perishable food and water per person. For a family of four, that means roughly 56 meals minimum. A 30-day supply is a stronger target: about 120 meals. Store 1 gallon of water per person per day for drinking and sanitation. Adjust quantities based on ages, dietary restrictions, and calorie requirements, since active adults and children need different amounts.
How do you keep emergency food fresh for years?
Store food in a cool, dark, dry place between 50-70°F, away from temperature fluctuations. Use airtight containers, Mylar bags, and oxygen absorbers to block moisture and pests. Vacuum sealing removes air that causes spoilage. Keep shelves off concrete floors and away from appliances that generate heat. Rotate stock regularly and check seals every few months. These steps preserve nutrient density and food safety far longer than open shelving.
Building a reliable emergency food supply comes down to steady conditions, airtight packaging, and the discipline to rotate what you store. Survive Nation carries the food storage and preparedness gear that makes each step easier, from mylar bags and airtight containers to water storage and outdoor lighting, all backed by a fast, user-friendly shopping experience and years of industry experience. Get started with Survive Nation and build a supply you can actually trust when it matters.